
Synthesis resources represent various types of information that can be shared between analyses. They may be created in one type of application and then shared with other Synthesis-enabled applications where they may be relevant. When the resource is updated with new information, the change is reflected automatically in all analyses that rely upon it. An example of a Synthesis resource is a reliability model that represents a product’s probability of operating successfully over a given period of time. The model may be published from Weibull++/ALTA, and then used in BlockSim to define the reliability characteristics of a block or used in Xfmea/RCM++ for failure modes analysis.
The following topics provide information about resources in Synthesis projects, including:
A description of all available Synthesis resources.
How to work with resource wizards to create, assign, edit or delete resources.
How to work with the Resource Manager.
How to use the Dependency Viewer to track the use of Synthesis resources.
A description of the Synthesis resources that can be used in multiple locations, including:
There are twelve basic types of resources that can be used in Synthesis projects. Although most resource types can be created and edited via the Resource Manager in any Synthesis-enabled application, not all resources can be used in all applications. For example, you can create or edit a universal reliability definition (URD) when you open the Resource Manager from Weibull++ but this resource is not used in any of the Weibull++ analyses. Resources can also be created on the fly in applications where they are used. Each resource can be used unlimited times anywhere within the project. The table shown next defines the resource types and shows which applications can create and use each type.
|
Resource |
Used In |
|
Universal reliability definitions (URDs) are used to describe a set of reliability and maintenance characteristics. |
BlockSim, RCM++, Xfmea |
|
Models can represent probabilities, durations or costs, either fixed or time-dependent. These resources are used by other resources (e.g., to represent reliability in a URD, to represent the duration of a task, etc.). |
Can be published from analyses in Weibull++, ALTA and BlockSim or created manually. Used in BlockSim, RCM++ and Xfmea. |
|
Tasks represent maintenance activities that can be assigned to URDs. There are two basic kinds of tasks: Corrective tasks are unplanned maintenance activities that are performed when a failure occurs. Scheduled tasks include preventive maintenance activities, inspections and on condition maintenance activities. |
BlockSim, RCM++ |
|
Task packages represent groups of tasks that are performed together at scheduled intervals. |
BlockSim, RCM++ |
|
Crews are assigned to tasks. They represent the labor personnel who will perform the maintenance activity. |
BlockSim, RCM++ |
|
Spare part pools are assigned to tasks. They are used to describe the conditions that determine whether a spare part will be available when needed and to specify the time and costs associated with obtaining the spare part. |
BlockSim, RCM++ |
|
Maintenance groups are sets of blocks where some event within the group can trigger either maintenance or state changes for one or more blocks, either within the group or outside of it. |
BlockSim, RCM++ |
|
Switches are assigned to standby containers in RBDs and standby gates in fault trees. They describe the behavior of the switch that transfers the activity from the active block to a standby block (and possibly back to the original active block, depending on the configuration). Switches are shown only in the BlockSim Resource Manager. |
BlockSim |
|
Mirror groups are used to represent the same event/component in different locations within your analysis. In Xfmea/RCM++, cause records in a mirror group are treated as one and the same event, allowing you to place the same cause in more than one location in the FMRA hierarchy. In BlockSim, blocks in a mirror group all represent a single component, allowing you to represent a single component more than once in a diagram or in multiple diagrams within a project. With BlockSim’s FMRA diagrams, blocks that represent causes can also be mirrored. |
BlockSim, RCM++, Xfmea |
|
Maintenance templates allow you to specify the order in which blocks in a diagram will be maintained when that diagram is used as a maintenance phase in a phase diagram. Maintenance templates are shown only in the BlockSim Resource Manager. |
BlockSim |
|
Actions allow you to define and track actions that need to be performed. |
All applications via My Portal; RCM++ and Xfmea for analyses |
|
Controls are used in RCM++ or Xfmea to represent methods that are planned or currently in place to reduce or eliminate the risk associated with potential failures. The Controls node will be available in the Resource Manager if the Enable Controls for Causes option is selected for the current interface style. |
RCM++, Xfmea |
Where resources are shown in properties windows (e.g., URDs shown in the FMEA hierarchy, models shown in the URD window, etc.), you can use a resource wizard to work with them. The arrow that provides access to the wizard is shown only for the resource field that is currently selected in the properties window. For all other resource fields, the availability of the tools is indicated by an ellipsis (...) in the field.
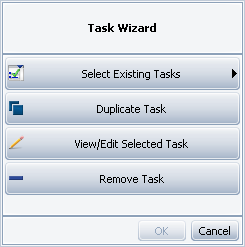
All of these wizards work in a similar manner except for the Model Wizard, which provides additional functionality that allows you to create the model directly within the wizard. See Model Wizard for instructions on how to use the wizard for setting the reliability model, task duration, cost per task, etc. The following images of the Task Wizard serve as the example for how to use all other wizards.
The Main page provides access to all available functions within the wizard. If a resource has not been assigned in the field, you can select an existing resource or create a new one.

If a resource has already been assigned, you can:
Select another existing resource to replace the current resource.
Create a duplicate of the current resource and assign the new copy in the field (e.g., if you want to use the same/similar properties but remove the association with the original resource that may be used in a different way elsewhere in the project).
View/edit the current resource.
Remove the resource from the current location (it will still be available for other records within the current project).
Most functions are also available as icons on the Select page of the wizard, which is the default view (except in the Model wizard, in cases where no model has yet been assigned). You can, however, always return to the Main page of the wizard by clicking the Back arrow at the lower left corner of the Select page.
The Select page provides a list of the resources of the specified type that currently exist in the project. This is the default view for all resource wizards except the Model wizard, and can also be accessed by clicking the Select Existing button or icon.
![]()
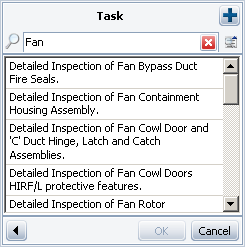
You can filter the resources that are displayed in the list by entering text in the Filter field (marked with a magnifying glass); clear the filter by clicking the Clear Filter icon in the field (red x). Select a resource and click OK (or double-click it) to assign the resource to the current location. If a resource was already assigned, the newly selected resource will replace it.
You can click the Select Resource icon to open the Select Resource window, allowing you to select an existing resource of the appropriate type. The Select Resource window can display more resources (a maximum of 1,000 are shown in the wizard) and more information about each resource; in addition, it offers a wider range of filtering tools.
![]()
To create a new resource from the wizard, click the Create New button or icon.
![]()
This will open the resource properties window of the appropriate type (e.g., the Maintenance Task window, the Crew window, the Spare Part Pool window, etc.). Once you have specified the properties for the new resource, click OK to create the resource and assign it to the current location.
If a resource has already been assigned and you wish to remove the association with the original resource but use the same (or similar) properties for the current location, you can click the Duplicate button on the Main page of the wizard. The new copy will then be assigned in place of the original.
If a resource has already been assigned, you can view and/or edit its properties by clicking the View/Edit button or icon.
![]()
IMPORTANT: Any changes you make to the resource will apply everywhere that the resource is used throughout the project. This includes analyses in other Synthesis-enabled applications.
If a resource has already been assigned, you can remove the resource from the current location (e.g., remove the task from the URD) by clicking the Remove button or icon.
![]()
The resource will still be available to be assigned to other records in the current project. If a resource is not assigned to any other locations within the project and you want to completely remove it from the database, choose Project > Synthesis > Resource Manager.
© 1992-2013. ReliaSoft Corporation. ALL RIGHTS RESERVED.