![]()
![]()
| Related Topics: | ||
The File Import Wizard allows you to import data from files saved by other applications and convert them to the format required for analysis in Weibull++ 8 or ALTA 8. This includes:
Excel files (*.xls)
Tab, Comma, Space and Semicolon delimited files (*.txt, *.csv, *.prn, *.smc)
To import data from any of these file types, select the Other file option in the Import Wizard. In the Open window that appears, choose the desired file type in the Files of type field, then browse for the file you want to import from.
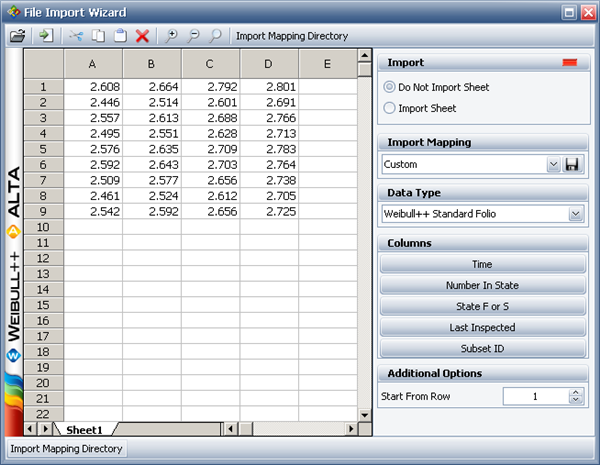
The import/conversion process will vary depending on the type of file that you have selected to import. For older version ReliaSoft files (i.e., Weibull++ 6 and 7, ALTA 6 and 7 and Office 7), all folios from the original project will be added to the current database and project. For delimited and Excel files, the File Import Wizard will be displayed. This utility displays the data from the selected file and allows you to specify how it will be converted and imported into a new standard folio.

The spreadsheet(s) on the left side of the utility display the data from the original file. To use the utility:
If the file you are importing from has multiple pages (e.g., an Excel spreadsheet with multiple worksheets), all pages are displayed in the File Import Wizard. For each page, use the Import area in the control panel to specify whether or not the data from the sheet will be imported. You will need to create column definitions for each page that you import from.
In the Data Type field, specify whether you are importing to a new Weibull++ standard folio or to a new ALTA standard folio. This can be different for each page that you import from.
Use the Columns buttons to match each column of data from the original file to a column available in the new standard folio by selecting the column in the spreadsheet and then clicking a button. At least one column must be identified as a Time value. Columns containing data that you do not want to import should be left unmarked.
Time indicates that the column contains time values that will be imported into the time column in the new standard folio. Depending on the type of data sheet, this could represent the time to failure, the time to suspension or the state end time for interval censored data.
Number in State indicates that the column contains quantities that will be imported into the Number in State column for grouped data in the new standard folio.
State F or S indicates that the column contains F or S entries that will be imported into the State F or S column to identify each data point as a failure or suspension in the new standard folio.
Last Inspected indicates that the column contains time values that will be imported into the Last Inspected column for interval censored data in the new standard folio.
Stress indicates that the column contains stress values that will be imported into a Stress column in the new standard folio. You can mark up to eight columns as stress columns. This option is available only when you are importing to an ALTA standard folio.
Subset ID indicates that the column contains data that will be imported into the Subset ID column in the new standard folio.
For most column types, you cannot have duplicate headings. For example, you can have only one Time column. The exception to this is Stress columns for ALTA standard folios (you can import up to 8).
If you are importing to an ALTA standard folio, specify the Number of Stresses. This reflects the number of stress columns, from 1 to 8, that you want to appear in the new folio. These columns will be created regardless of whether you assign that many Stress columns in the File Import Wizard.
If desired, you can enter a row number in the Start from Row field. The import will start at the specified row. This can be useful in cases where the original file has column headings, for example.
Click Import to import the data into a new standard folio based on your specifications.
![]()
If you have other data type files that are not listed in this topic, you may still be able to import them in the application using a few work-arounds. One such work-around would be to open the non-compatible files in another application that accepts that format and then save them in one of the accepted formats. Another way is to use the Clipboard to copy and paste the data into the standard folio.
Once you have defined all of the columns that you wish to add, you can click the Save Import Mapping icon in the Import Mapping area of the control panel.
![]()
This allows you to save the current definitions as an import mapping that can be used in the future. You can choose a saved import mapping from the drop-down list in the Import Mapping area to use it for the current import.
By default, import mappings are saved in the default import mappings directory, which is located at C:\Documents and Settings\[user name]\Application Data\ReliaSoft\[Weibull 8 or ALTA 8]\Import Mappings. You can change the directory where the import mappings are saved by clicking the Import Mapping Directory button and specifying the desired path in the Browse for Folder window that appears. The directory you specify here will be used to populate the drop-down list of import mappings, and for saving import mappings unless you specify a different location while you are saving the import mapping.
© 1992-2013. ReliaSoft Corporation. ALL RIGHTS RESERVED.