
| Related Topics: | ||
The Import window allows you to share specific project items (i.e., analyses, multiplots, reports and project-level attachments) or resources between existing projects.
To access the Import window for importing project items, choose the Items option in the Import/Export Wizard. To import resources, choose the Resources option in the Import/Export Wizard. These options are available only if you have a project open.
You can import items or resources to the current project from:
Another project in the current database.
A project in another existing database.
In the Select Repository to Import From area, specify the Synthesis database that you want to import from; the drop-down list shows recently used databases, or you can click the Browse icon (...) to browse for a database. This can be a standard database (*.rsrp), a compressed standard database (*.rsgz) or an enterprise database connection file (*.rserp).
The projects in the selected database will be displayed in the Source Project area. You can use the filter area above the list to refine which projects are displayed.
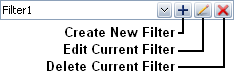
You can choose an existing filter from the drop-down list. To create a new filter in the Filter Properties window and apply it, click the Create New Filter icon. To edit the filter that is currently being used, click the Edit Current Filter icon. To delete the filter that is currently being used, click the Delete Current Filter icon. This will delete the filter entirely; there is no undo for delete. If you want to keep the filter for future use and simply stop using it right now, choose a different filter from the drop-down list. The Default Filter option shows all project in the database.
You can also search for projects by entering text in the Find field. The list updates dynamically to show only the projects with names that contain the text that you have entered.
When you select the project that you are importing from in the Source Project area, the contents of the source project will appear in the Select Items to Import area, under the project name within the corresponding folder (e.g. overlay plots will appear under the Multiplots folder). Select the check box next to each item you want to import. If you select the box next to the folder, all the items within that folder will automatically be selected to be imported. You can also select the box next to the name of the project to import all items within that project.
Click Import to import the selected item(s) or resource(s).
If you select to import an item or resource that has the same name as an item/resource that already exists in the current project, the imported item will be renamed as "(name of item)_[increment]." For example, if your current project contains a diagram named "System A" and you select to import a diagram named "System A" from another database, then the imported "System A" will be renamed to "System A_1."
If you selected to import an item that refers to other items in the project (e.g. if you selected to import an overlay plot that refers to several analyses) and you did not select to import the item(s) it refers to, then when you click OK in the Import window, a window will appear asking if you also want to import the referenced items. Click Yes to import the items that are displayed in the window. Click No if you do not want to import the items displayed in the window. The items you selected in the Import window will be imported into the current project. Any analyses, plots or reports that refer to unimported items will be imported in their current state, but if you refresh or change settings these items, their contents will be lost. Click Cancel to cancel importing any items and return to the Import window.
Exporting works similarly to importing. You can export items from the current project to:
Another project in the current database.
A project in another existing database.
A new database, thereby creating a project in that database in the process.
![]()
© 1992-2013. ReliaSoft Corporation. ALL RIGHTS RESERVED.