
All Synthesis-enabled applications allow you to attach URLs and/or files that were created in other applications. This helps you to keep supporting documentation all together in the same place with your analysis. You can attach URLs and/or files to:
The project
Blocks in RBDs and fault trees
Most types of resources, including:
There are two types of attachments: linked and embedded.
Linked attachments may be URLs or files. For these attachments, the software stores the path to the URL or file. This allows you to open the attachment directly from the current project explorer, block or resource, provided that the necessary software is installed on your computer and the link is valid. The files themselves are not stored inside the project.
Embedded attachments are always files (i.e., you cannot embed a URL). For these attachments, the software stores a complete copy of the attached file inside the database. Please note that embedded attachments will increase the file size of the database.
To add an attachment to a project, choose Insert > Attachments > Attachment or right-click the project or the attachments folder in the current project explorer and choose Attachment on the shortcut menu.
![]()
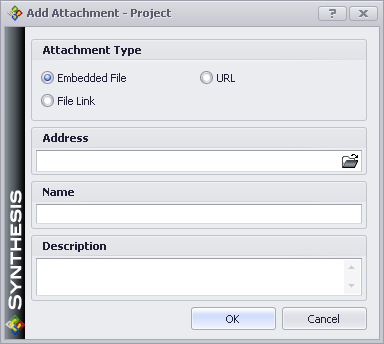
The Add Attachment window will appear, as shown next.

Specify what you are attaching by selecting either Embedded File, File Link or URL in the Attachment Type area.
If you are attaching a file, click the Browse icon in the Address field to browse for and select the file to be attached.
If you are attaching a URL, enter the URL in the Address field. The Name field will be populated automatically based on the Address field. If desired, you can change the name and/or enter a Description for the attachment.
Click OK to create the attachment.
Right-clicking an attachment in the current project explorer and choosing Edit Item opens the Edit Attachment window, which allows you to edit the name and description of the attachment and, in the case of attached URLs, the address.
Note: You can also add attachments to a project by clicking the Attachments icon in the Project Properties window. This works like adding attachments to blocks or resources, explained below, in that you will go through the Attachments window.
To add an attachment to a block or resource, click the Attachments icon in the properties window for the block or resource. The Attachments window will appear, as shown next.

This window allows you to manage the attachments for the block or resource. Existing attachments are shown in the table. Click a column header to sort the attachments by that column; click the column header again to reverse the direction of the sort.
At the bottom of the window are commands that allow you to add, edit, delete, open or save a copy of the attachment. Note that deleting embedded files deletes the actual file from the project. For linked files or URLs, deleting the attachment removes the link to the file, leaving the original file untouched.
© 1992-2013. ReliaSoft Corporation. ALL RIGHTS RESERVED.